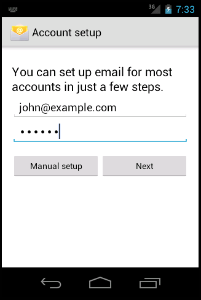
In most Andriods, the email application icon appears in device's main screen.
In the Applications screen, tap Email. The Account setup interface will appear.
Enter your full email address and password in the account Setup interface text boxe, as pictured below.
Tap Manual setup to proceed to the next screen of the Account setup interface.

Tap the desired account type i.e. The POP3 or IMAP. We recommend that you select the IMAP mailbox type.
-
POP3: POP3 will download the emails from the server and store them on your phone.
-
IMAP: IMAP will store the emails on the server and show a cached copy on your phone

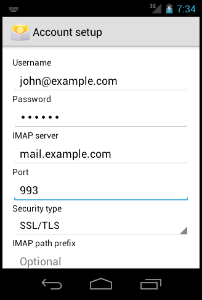
On the next screen you have to set up account details, for which necessary data is as under:
- Username - The email address you are trying to connect to
- Password - The password to that email address
- Incoming or IMAP server - mail.yoursitesdomain.com (be sure to input your actual domain name)
- Port - 143
- Outgoing / SMTP Server - mail.yoursitesdomain.com (be sure to input your actual domain name)
- Port - 26
- Security Type - None
- IMAP path prefix - Leave blank
- When using SSL / TLS (which is more secure) you may need to set incoming and outgoing mail server to server.resourcesofnet.net
- IMAP Port: 993
- POP3 Port: 995
- SMTP Port: 465

According to your phone and andriod version you will come across scressns to select the checkboxes that correspond to your desired email preferences, like checking email after every 15 minutes etc. You can configure these to your needs.
Please note that for your emails with Unique Links, more than 5 incorrect login attempts in one go, will render the email / IP address blocked in server firewall.
